Monday, 29 November 2010

New recipe - Red velvet cupcakes with cream cheese frosting...yum!

I wonder what took me soooo long to try this recipe. Red velvet is one of the most popular cupcakes in America. This recipe is courtesy of the Hummingbird Bakery cookbook. It was a lot quicker and simpler to make than I thought.

Ingredients
60g butter at room temperature
1 egg
150g caster sugar
10g cocoa
10ml red food colouring (preferably
Dr. Oetker Red Food Colouring
1/2 tsp vanilla extract
120ml buttermilk
150g plain flour
1/2 tsp bicarbonate of soda
1 tsp baking powder
1/2 tsp salt
1 1/2 tsp white wine vinegar

Frosting
300g icing sugar, sifted
50g butter at room temperature
125g cream cheese, chilled

Preheat the oven to 170°C (325°F) Gas 3.

Put the butter and the sugar in a freestanding electric mixer with a paddle attachment (or use a handheld electric whisk) and beat on medium speed until light and fluffy and well mixed.  Turn the mixer up to high speed, slowly add the egg and beat until everything is well incorporated.

In a separate bowl, mix together the cocoa powder, red food colouring and vanilla extract to make a thick, dark paste. Add to the butter mixture and mix thoroughly until evenly combined and coloured (scrape any unmixed ingredients from the side of the bowl with a rubber spatula). Turn the mixer down to slow speed and slowly pour in half the buttermilk. Beat until well mixed, then add half the flour, and beat until everything is well incorporated. Repeat this process until all the buttermilk and flour have been added. Scrape down the side of the bowl again. Turn the mixer up to high speed and beat until you have a smooth, even mixture. Turn the mixer down to low speed and add the salt, bicarbonate of soda and vinegar. Beat until well mixed, then turn up the speed again and beat for a couple more minutes.

Spoon the mixture into the paper cases until two-thirds full and bake in the preheated oven for 20–25 minutes, or until the sponge bounces back when touched. A skewer inserted in the centre should come out clean. Leave the cupcakes to cool slightly in the tray before turning out onto a wire cooling rack to cool completely.

And here are the results decorated with mini oreo cookies and maltesers:


And thanks to Grace for the gorgeous cupcake stand....I love it.

Thursday, 25 November 2010

Everyone loves good feedback...

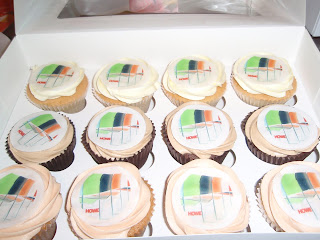
It's good to know that your hard work is appreciated!  The following is a testimonial from my corporate client on the branded cupcakes I supplied last month:


Hi Cheryl,

I just wanted to say how pleased I was with the cupcakes, the company image and logo was literally the icing on the cake!! I have had fantastic feedback from my meetings and have passed your details on to others. On most occasions I received thank you emails before I got back to the office and in one instance all the cakes had disappeared before I’d left the building so thank you very much and I will definitely be using you again for my other clients.

Kind regards
Andy Green
Howe UK

I think I'd better get a website...!

Friday, 12 November 2010

The moment you've all been waiting for...or maybe not!

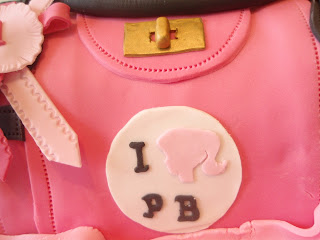
I'm not sure how many times I have mentioned the Paul's Boutique bag, but you're probably sick of hearing me go on.  So here it is...


When I delivered it the birthday girl was there and it was nice to see her reaction.  She was chuffed.

Branded cupcakes

When I came up with the idea to make cupcakes, I was simply looking for a way to make some extra money.  I thought it was simple and quick and easy to market.  I never imagined that I would become a supplier to the corporate world!!

My lovely brother used his gift of the gab and basically sold my cupcakes to one of his industry contacts.  I took in a sample and got an order for six dozen!   My first thought was "yeah, brilliant", my second was "shit, how am I going to manage this!  Well I did and my client was very pleased.  So much so that there may be the opportunity for further orders.

Here we have lemon cupcake with lemon marmalade filling and lemon frosting

This is a chocolate cupcake with orange marmalade filling and chocolate orange frosting

My favourite, vanilla cupcake with strawberry jam filling and a vanilla frosting, yum!

The cakes are branded with a logo sent by my client.

Wednesday, 10 November 2010

Did you make those shoes?

It's been the busiest week that I've had in a long time.  Thankfully I'll be done by Friday with the delivery of the Paul's Boutique bag.

So the christening cake was beautiful...and I got lots of compliments from the guests.  And here it is...


My second go at the converse baby sneakers


I loved the feet, althought I had to put on 110 individual little toes...awwww!  My sister-in-law loved it so I am very happy.  I hope to get the chance to make another christening cake very soon.

Oh and I think I need a new camera, this one is rubbish :-)

Thursday, 4 November 2010

These should really be Guy Fawkes cupcakes...

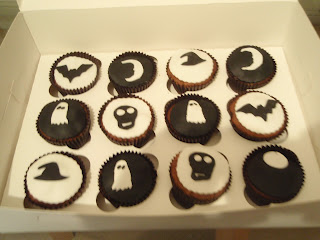
OK, Halloween has come and gone, but my friend's party is a belated one.  So here are the cupcakes I made.


These are dairy-free carrot cakes decorated with fondant.  Hope you enjoy them Laura!!

Wednesday, 27 October 2010

Converse baby booties

I'm very pleased with my first attempt at a pair of converse booties for the top of my nephew's christening cake.  Take a look -


I was surprised at how quickly I managed to achieve these results.  I thought it would take forever, but it only took about 45 minutes.  I've got a few tweaks to do, but this was a good practice for the real ones with I will do later this week.  I hope my sister-in-law likes them...

Sunday, 24 October 2010

Halloween cupcakes

As I have to do some Halloween cupcakes for a friend's party I have been researching recipes and design ideas on the net.  There is so much out, but I have to thank my good friend for pointing this book out to me, A Zombie ate my cupcake.

A Zombie Ate My Cupcake!
For great ideas for decorating gruesome cupcakes for any good Halloween party...give it a go!

Saturday, 23 October 2010

One down...four to go!!!

I'm actually getting quite good at this cake lark...I've finished the 50th birthday cake with time to spare.  I do think that I am underselling myself slightly.  But how much will people pay for a stylish, handcrafted, delicious, homemade cake?  Answers on a postcard please.  How much would you pay for the cake below?

It's a single tier vanilla sponge with jam and buttercream filling, with no additives (artificial or otherwise).  It is iced with white fondant, and decorated with a pink sugarpaste bow and pink sugarpaste flowers. 


Next...the christening cake and the Halloween carrot cupcakes...

Thursday, 21 October 2010

Lot's of things in the oven...and a Paul's Boutique bag

Wow, I can't believe it, I have more orders for the coming weeks.  I've received an order for corporate branded cupcakes, up to six dozen!  I also have a 50th birthday cake and a christening cake for my nephew, plus a Paul's Boutique bag for an 11th bithday.  With Halloween fast approaching I've also got an order for some Halloween cupcakes.

I'm on the lookout for some new recipes for non-dairy cupcakes, as my friend is lactose intolerant.  I know she won't mind as the cupcakes are for her party and she will probably have one anyway, but I want her to be able to enjoy them without the after effects!

For the 50th birthday cake I wanted to try something new, but the lady has asked for a bow cake.  I might do something else, for the practice.  I think I have the bow cake sorted!

My first attempt at a bow cake
My second attempt at a bow cake
OK, so I'd never heard of Paul's Boutique until a lady in my haridresser's asked me for one for her 11 year old daughter's birthday on 14 November.  So I've had to go to my trusty Google...and here it is!!  I've got my work cut out!!!


And then my plan for my nephew's christening cake is to top it with a pair of converse booties!!  So cute...
As well as these cakes I also have to make a Christmas cake for my church fair.  All to be delivered by 12 November!  Help...but on the bright side I have almost completed the bow cake and I'm starting the bootie today so I reckon I can do it.

Wednesday, 6 October 2010

Louis Vuitton handbag cake

I did it!!!  I managed to create a cake that looked like a Louis Vuitton bag, and the customer was very pleased.  It was quite an achievement.

First I had to bake four cakes (two dark chocolate and two white chocolate) with one tin!!  Equipment is quite expensive, so I have been using what I have.  The cakes turned out very well and I have been using the same recipe for my cupcakes.

Here is the cake un-iced sandwiched together with chocolate buttercream.  This was a very chocolately cake.


I then carved the shape of the bag -


I then had to ice the cake.  My intention was to use white fondant and colour it brown, but that didn't work as the colour did not come out brown enough.  I was advised to use chocolate flavoured fondant which was the exact colour I needed. 

At this point I thought there was no way I was going to make this cake look like a Louis Vuitton bag.  More like a big lump of chocolate on a board!  But someone was expecting it for their birthday celebrations and I couldn't let them down.  So the next thing I did was paint the logos on the cake.  I did this by copying the logos from the Internet and cutting them out in card.  I then used the card as a stencil which I pressed lightly into the fondant to show me where to paint.  This meant that I have to paint the stencilling all at once because once the fondant starts to dry it would crack when I pressed the logo into it.  It took me about three hours to paint all the logos on!!!!  My back was killing me by the end.


So once I'd exhausted myself painting on the logos, I decided to leave the rest until the next day even though that was the delivery day!  I was cutting it fine, but hey, life would be too boring if we didn't take chances!

All that remained was the handles and the decoration of the board (Happy Birthday Chloe).  So bright and early and with a determined attitude I set to work on the handles etc...
and I finished just in time to get it delivered.  It was stressful, but I am glad I did it.  I learnt a lot from doing this cake, and can't wait to do it again.


My next project is my nephew's christening cake for the first week in November so watch this space...

Saturday, 11 September 2010

Update - Louis Vuitton handbag cake

So...bit of a cake drama, the chocolate cake recipe from my previous post turned out to be a bit rubbish!!  It tastes nice enough but unfortunately it came out with sink holes at the bottom (that's the only way I can think of to describe what happened to the cake).  I tried it twice at different temperatures and cooking times, but no change.

I always imagined that as long as you follow a recipe it will turn out as expected.  It was so frustrating to get a bad result.  There are 100s of recipes online that you're spoilt for choice.  How do you know a good recipe from a bad one.  Trial and error?  Look at the comments (these are usually mixed and a matter of taste!).  Anyway, the recipe below is really simple, quick and produces a light moist sponge.

So I had to find a different recipe and I am please to report that IT WORKED!!!  I now have two beautiful dark chocolate & two white chocolate cakes ready for decorating!!!

Here is the recipe (courtesy of Jane Hornby on BBC Good Food):


Ingredients
175g butter , softened, plus extra for greasing
100g white chocolate (we like M & S or Green & Black's with real vanilla)
100g dark chocolate (70% cocoa)
3 eggs
100ml whole or semi-skimmed milk
175g caster sugar
1 tsp baking powder
200g self-raising flour
2 tbsp very strong coffee (instant is fine)
1 tsp vanilla extract
 
For ganache
284ml pot double cream
200g dark chocolate (70% cocoa)
50g white chocolate , melted
small bag white chocolate Maltesers (optional)

Heat oven to 180C/fan 160C/gas 4. Butter and bottom-line 2 x 20cm sandwich tins. For the cake, break the white and dark chocolate into two small bowls, then melt in the microwave on High for 1 min or over a pan of simmering water. Put everything else, except the coffee and vanilla, into a large bowl, then beat until creamy.

Divide the mixture in two, then add the coffee and melted dark chocolate to one bowl, and the vanilla and melted white chocolate to the other. Stir until mixed through, then tip into the tins. Bake for 20-25 mins until risen and slightly shrunk from the sides of the tins. Cool in the tins for a few mins, then turn onto a wire rack.

For the ganache, heat the cream in a pan, then break the dark chocolate into a large bowl. Once the cream is just boiling, pour it onto the chocolate, then leave for 5 mins. Stir until smooth, then leave until thickened and cool. Split the cakes in two across the middle (a bread knife works well), layer up the pieces, alternating white and dark layers, and sandwiching, then topping them with the ganache.

To decorate, spoon the melted white chocolate into a piping bag with a fine nozzle (or use a sandwich bag and snip off the end instead). Zig-zag the white chocolate over the cake, then finish with a scattering of white Maltesers. Serve on its own or for dessert with pouring cream. Best eaten on the day, but keeps in an airtight container for up to 3 days.

So if you are making this cake for a family occasion, you can follow the recipe and split each cake in 2 before decorating.  For the purposes of my handbag cake, I baked four times (2 chocolate and 2 white chocolate).

So now I just have to ice the cake and decorate it.  Look out for pics of progress!

Thursday, 9 September 2010

Louis Vuitton handbag cake

So I have just put the chocolate mud cake into the oven.  Just enough time to update on progress.  Had a bit of a nightmare yesterday with the white chocolate part of the cake!  The whole thing is now in the bin!!!

Anyway, I used the following recipe for the dark chocolate mud cake (courtesy of Exclusively Food):

250g chocolate (we use 125g dark chocolate and 125g milk chocolate)
250g butter (if using unsalted butter, add 1/4 teaspoon salt with the butter)
1 teaspoon instant coffee granules/powder
188ml (3/4 cup) water
325g (2 cups plus 2 tablespoons) plain flour
30g (1/4 cup plus 2 teaspoons) cocoa powder
1/2 teaspoon bicarbonate of soda (baking soda)
550g (2 1/2 cups) caster sugar
4 large eggs (we use eggs with a minimum weight of 59g)
2 tablespoons (40ml) oil (we use peanut oil, but any mild-flavoured oil could be used)
1 teaspoon (5ml) vanilla extract
125ml (1/2 cup) buttermilk


Preheat oven to 160 degrees Celsius (not fan-forced).

Grease the side and base of a deep 23cm or 24cm diameter (inside top measurement) round cake pan. We use a springform pan for easy removal of the cake. Line base and side of the pan with non-stick baking paper, extending the paper a few centimetres above the top rim of the pan.

Place 250g chocolate, butter, coffee and water in a large saucepan over low heat, stirring occasionally. When chocolate and butter have melted, remove mixture from heat and allow to cool to lukewarm/room temperature.


Sift the flour, cocoa powder and bicarbonate of soda together into a very large bowl.  Add the caster sugar to the bowl with the flour mixture, and stir the ingredients together until well combined. For this recipe, we prefer to use a whisk to stir ingredients together.

In a medium bowl, place eggs, oil, vanilla and buttermilk.  Whisk the wet ingredients together until well combined.


Add the egg mixture to the flour mixture and stir until well combined. 

Add the chocolate mixture to the egg and flour mixture in a three batches, stirring until combined after each addition.

Pour mixture into prepared pan.


Bake for about 1 hour and 15 minutes (24cm pan) or 1 hour and 30 minutes (23cm pan). Insert a thin-bladed knife or wooden skewer into the centre of the cake to test whether it is cooked through. If the knife/skewer comes out clean or with moist crumbs (not gooey batter) attached, the cake is ready.
Remove cake from oven, cover with a clean tea towel and allow to cool in the pan.
As this is a handbag cake I have used a rectangular tin 7" x 11" x 3".  Quantities and baking times remain the same.

Stay tuned for update on dark chocolate cake and progress on white chocolate cake!  Wish me luck...

Wednesday, 8 September 2010

Welcome to my blog

I've decided to take a leaf out of my sister-in-law's book and start my very own blog. So what am I going to chat about I asked myself. Well of course it would have to be something I have a little knowledge about and something that I want to share with others.


Well about three months ago I started making cupcakes for family and friends. I'm quite proud to say that they have been going down a storm. So much so that I have started selling them to friends and friends of friends. So I thought that I could share my recipes, ideas and designs with you all.


So far I have sold two cakes (a 70th birthday cake and a 3rd birthday cake) and I am working on my third cake (for a 20th birthday). This one is a chocolate cake (layers of white and dark chocolate sandwiched with chocolate buttercream). It will be decorated as a Louis Vuitton bag! A daunting prospect for me as I haven't done one before, but I will giving it my best!

Below is a picture of the cake I did for a 70th birthday.

Here is a picture of the cake for the 3rd birthday.
So stay tuned for an undate on the Louis bag, I will be posting pics soon.
Related Posts Plugin for WordPress, Blogger...